In this post, we are going to create a Docker image to use as a build agent to Azure DevOps pipelines. The process followed in this blog post is similar to the process followed in the post where we used an Azure VM as the build agent. The difference is, instead of using an Azure VM as an agent, we are going to run a Docker container as an agent on localhost.
Prerequisites
1. An Azure DevOps project to build using the Docker agent. We are going to use the PartsUnlimited project we created in an earlier post which meets these criteria.
2. Have Docker installed on your local machine with the ability to create and run Windows containers (Refer to the troubleshooting section on how to switch).
Steps
There are a lot of steps involved in creating a Docker agent and running the build pipeline on it. So I will add subtopics between steps to group steps related to a specific subtask.
1. Creating the Agent pool and generating personal access for the new build agent
1.1. Navigate to dev.azure.com, and navigate into your project with the build pipeline.
1.2. Click on the gear at the bottom left corner to access the project settings.

1.3. In my case, the settings topic list is not shown since I have made the window smaller. So I had to click on the arrow to the left of the "Project details" heading to get to the following settings topics. Among the topics click on the "Agent pools" topic under the "Pipelines" heading.

1.4. In the following agent pools page you see after completing the above step, click "Add pool" near the top right corner.

1.5. This will prompt you to enter the configurations for the new agent pool. Select "Self-hosted" as the pool type and give it a name (we are going to use this name to like the build agent to this pool). I named the pool "Azure VM pool" which I will use when setting up the agent. Then click "Create". This will create a new agent pool.

1.6. Next step is to create a personal access token for the build agent to connect to this pool. To do this we need to navigate to the security page by clicking on the user profile button (circle with your initials) and then selecting security in the resulting menu as follows.
1.7. This will lead you to the personal access token page shown below. Click "New Token".
1.8. Give a token name, select your organization and you can leave the expiration date as is. Select the "Custom defined" authorization scope. We need to select agent pools scope from the scope list but it is not shown in the default scope set. To see it click on the "Show all scopes" at the bottom of the prompt. Select both "Read" and "Read & manage" capabilities under the "Agent Pools" scope. Then click "Create".

1.9. Next, you will be given the generated access token. Copy and store this token for future reference as this is needed to configure the Docker agent.

2. Creating, configuring and running the Docker agent
2.1. Create a new folder named "dockeragent" in one of your disk partitions. With the completion of the following two steps, the folder content will look like the following screenshot.
2.2. Create a file named "Dockerfile" (without an extension) in the new folder with the content of this git file. (Link to the normal view of the same file)
2.3. Create a file named "start.ps1" in the new folder with the content of this git file. (Link to the normal view of the same file)
Note: Correct file names are really important in this case as names link these two files and Docker depends on the file name. Make sure at the end of the above steps, the file names are correct and you have the view shown in step 2.1.
2.4. Open a Powershell window and change the directory to your newly created directory. In my case, I executed "cd D:\dockeragent\" as follows.

2.5. While inside the new folder, execute "docker build -t dockeragent:latest ." to create the Docker image. At the end of the execution, you will see a message sequence similar to the following screenshot. This command might end up in error if your Docker installation is configured to run with Linux containers. Please refer to the troubleshooting section at the end of this post on how to switch Docker to use Windows containers.
2.6. After creating the docker container you can run it using the following command. Please replace the placeholders with the correct values.
docker run `
-e AZP_URL=<Azure DevOps instance> `
-e AZP_TOKEN=<Personal Access Token created and saved in step 1.9> `
-e AZP_AGENT_NAME=dockeragent `
-e AZP_POOL=<Pool to register the agent under> `
dockeragent:latest
Following is an example command based on my settings.
docker run `
-e AZP_URL="https://dev.azure.com/azuresameerakOrg" `
-e AZP_TOKEN=############################################## `
-e AZP_AGENT_NAME=dockeragent `
-e AZP_POOL="Docker agent pool" `
dockeragent:latest
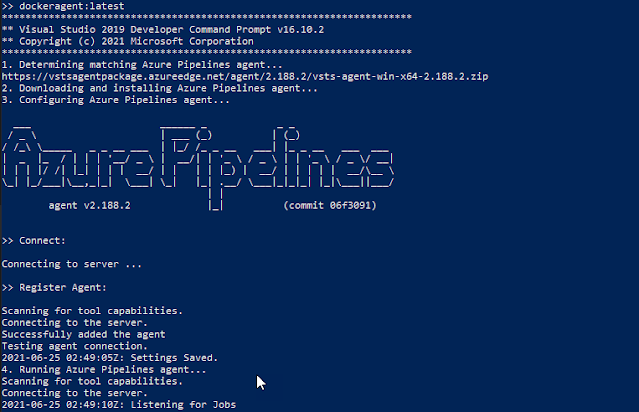
2.7. With the execution of the above command, the container will start and connect to the agent pool created in step 1.5. You will see something similar to the following screenshot as the agent begin to listen to the build requests.
2.8. Now navigate into the Agents tab of the newly created Agent pool and you will see that the new agent is listed with the name you provided in the previous run command. Now we can use this agent pool to build pipelines.
3. Running the build pipeline on the Docker agent
3.1. Navigate to your Azure DevOps project and navigate to the build pipelines by selecting the pipelines icon (blue coloured icon) in the left-hand side menu and selecting pipelines.
3.2. Start creating a new pipeline by clicking "New Pipeline" near the top right corner of the above screen. This will start the new pipeline creation process as follows.
3.3. Select "Azure Repos Git" as we are going to build this project's repo, and select the "PartsUnlimited" repo from the below screen.
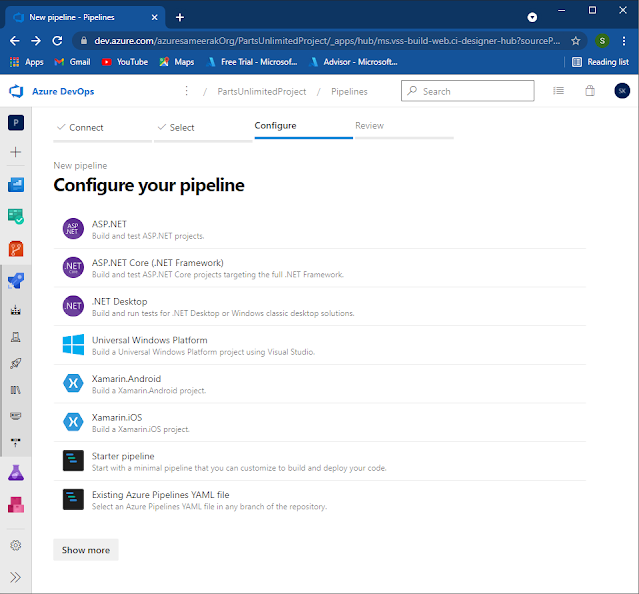
3.4. Next screen shown below is to select the configuration. We will choose "ASP.Net Core" (2nd option) as the configuration.
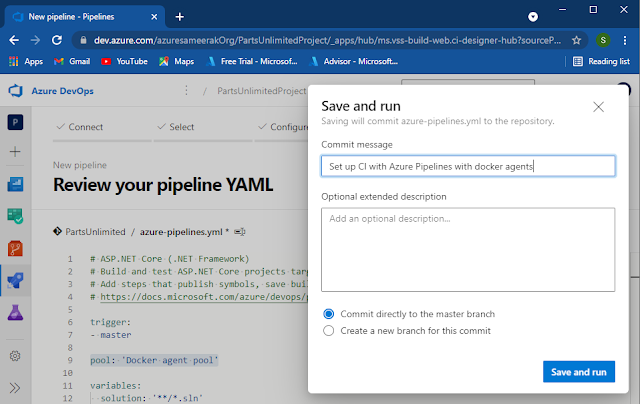
3.5. Next you get to review your pipeline configuration before saving and running. Here the "pool" parameter comes with the default value. Change it to the value of the newly created agent pool name as highlighted in the below screenshot, and click "Save and run".
3.6. Give a commit message for the commit to add this build file to the repo in the following screen and click "Save and run".
3.7. This will trigger a build of the new pipeline, but it fails with the message "No agent found in pool Docker agent pool which satisfies the following demand: vstest" as in the following screenshot. The reason for this is that the VSTest module does not come installed in the base image we used to create our Docker container. Fortunately, there is a VSTest installer task we can add to our pipeline to install VSTest on the agent. We will add this task in the next subtopic and make the build run on the Docker agent we created.
4. Correcting the build pipeline configuration and getting the build to run
In this subtopic, we will add a "VisualStudioTestPlatformInstaller" to our new pipeline to make the Docker agent eligible to run the pipeline.
4.1. As the first step navigate to the pipeline listing by selecting the pipelines icon (blue coloured icon) in the left-hand side menu and selecting pipelines.
4.2. Select the new pipeline "PartsUnlimited". In the following resulting view click "Edit".
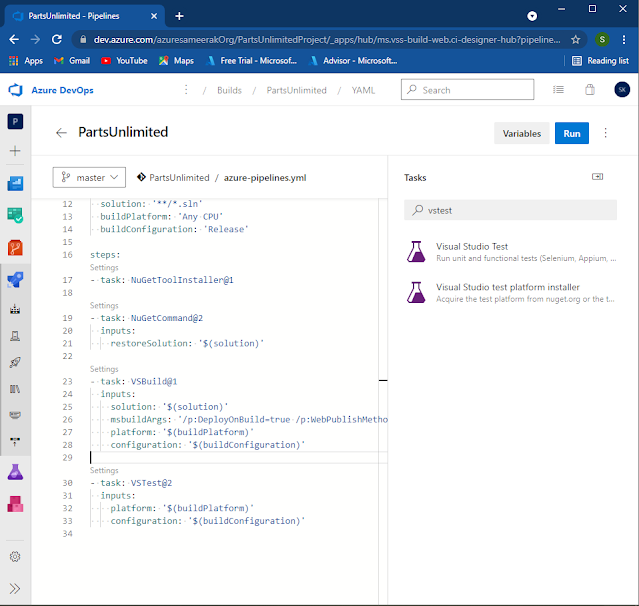
4.3. Place your typing cursor between the "VSBuild@1" task and the "VSTest@2" task (Line 29) in the resulting edit view, and search "vstest" in the search box to the right. Click on "Visual Studio test platform installer".
4.4. Accept default values in the following screen and click "Add".
4.5. This will add the new "VisualStudioTestPlatformInstaller@1" task into the pipeline. This new task should be added above the test task.
4.6. Next we need to update the test task to use the VSTest modules installed by the added installer. To do this we need to set the "vsTestVersion" as "toolsInstaller" under "inputs" as highlighted in the below screenshot. Then click "Save" to get to the next step.
4.7. Add a commit message on the next page and click "Save".
4.8. Click "Run" on the following resulting page.
4.9. Accept defaults and click "Run".
4.10. This will start the build and execute in the Docker agent we are running in localhost. However, this build will fail at the build task as the Docker agent has only the newer versions of Visual Studio.
Note: Above build failure can be mitigated by removing the "DepValidation" project from the solution. To do this we need to clone the git repo to our local machine, open the solution in Visual Studio and remove the "DepValidation" project from the solution. I'm not gonna include these steps in this blog post. Following is a screenshot of the passing build pipeline after removing the incompatible project from the solution.
This concludes this blog post on creating a Docker agent to run Azure DevOps pipelines and running the pipeline on the Docker agent. This
git repo contains the solution with the "DepValidation" project removed which can be used to successfully build the pipeline. The Docker Agent configuration I used to build this repo using Azure DevOps is located in the
dockeragent directory.
Troubleshooting
1. Switching Docker to use Windows containers instead of Linux containers.
Since our Docker agent is windows based we need the local installation of Docker to work with Windows containers. However, this capability is only available in Windows 10 Pro or enterprise build >= 14372, as shown in the screenshot below.
When I tried to build the container without switching to Windows containers I received the following error message "failed to register layer: Error processing tar file(exit status 1)".
Once your machine is capable of switching Docker to use Windows containers, right-click on the Docker taskbar icon and select "Switch to Windows containers..". This will prompt you to confirm this switch as follows.
This switching process might face errors due to Hyper-V not enabled, and you will receive the following prompt.
Follow the link in the error message and follow the instruction on the page to enable Hyper-V. This complete process of switching to Windows containers involve several machine restarts. Finally, when the Docker switch to windows containers you will see an option to switch to Linux containers when you right-click on the Docker icon in the taskbar. This option can be used to switch back to Linux containers when needed.
2. Setting VSTest task to use the VSTest installed by the VisualStudioTestPlatformInstaller.
Even though the Docker image we use to create our agent has Visual Studio installed it does not seem to install VSTest on the container. Therefore we need to manually install it using the VisualStudioTestPlatformInstaller. However, the VSTest installed by the VisualStudioTestPlatformInstaller is not automatically used by the VSTest task that runs next. We need to point the VSTest task by setting the vsTestVersion input parameter of the VSTest task, and this parameter value is only available for VSTest version 2.*.
When using the YAML file to edit the pipeline (like we did in this post) we can set this value by adding a new line as in step 4.6. If you are using the graphical pipeline editor for a pipeline created using the classic editor, you need to add the "Visual Studio Test Platform Installer task" before the VSTest task and set the task version of the VSTest task to 2.* with "Test platform version" set to "Installed by Tools Installer". More configuration option can be found in the
VSTest Documentation.
In case you forget to set the VSTest to use the version installed by the VisualStudioTestPlatformInstaller, VSTest task of your pipeline will end up with a "Error: Visual Studio 2015 is not found. Try again with a version that exists on your build agent machine.", eventhough an installation of the Visual Studio with an eligible VSTest module is available in the agent.









Comments
Post a Comment