Building an Azure DevOps project with an Azure VM build agent
Introduction
In the previous blog post, we could not complete the Azure DevOps project build with the default agent due to capacity limitations. Therefore, in this post, we are going to create a build agent using Azure VMs and use that agent to successfully run the build pipeline.
Prerequisites
1. An Azure account (which you can create following the instructions on a previous post), and use it to log in to the Azure portal and create the Azure VM.
2. An Azure DevOps organization (which you can create following the instructions on this previous post), to create the sample project.
3. An Azure DevOps project with a build pipeline. We are going to use the PartsUnlimited project we created in an earlier post which meets these criteria.
Steps
There are a lot of steps involved in creating an Azure VM, configuring it as a build agent and running the build pipeline on it. So I will add subtopics between steps to group steps related to a specific subtask.
1. Creating the Agent pool and generating personal access for the new build agent
1.1. Navigate to dev.azure.com, and navigate into your project with the build pipeline.

1.2. Click on the gear at the bottom left corner to access the project settings.

1.3. In my case, the settings topic list is not shown since I have made the window smaller. So I had to click on the arrow to the left of the "Project details" heading to get to the following settings topics. Among the topics click on the "Agent pools" topic under the "Pipelines" heading.

1.4. In the following agent pools page you see after completing the above step, click "Add pool" near the top right corner.

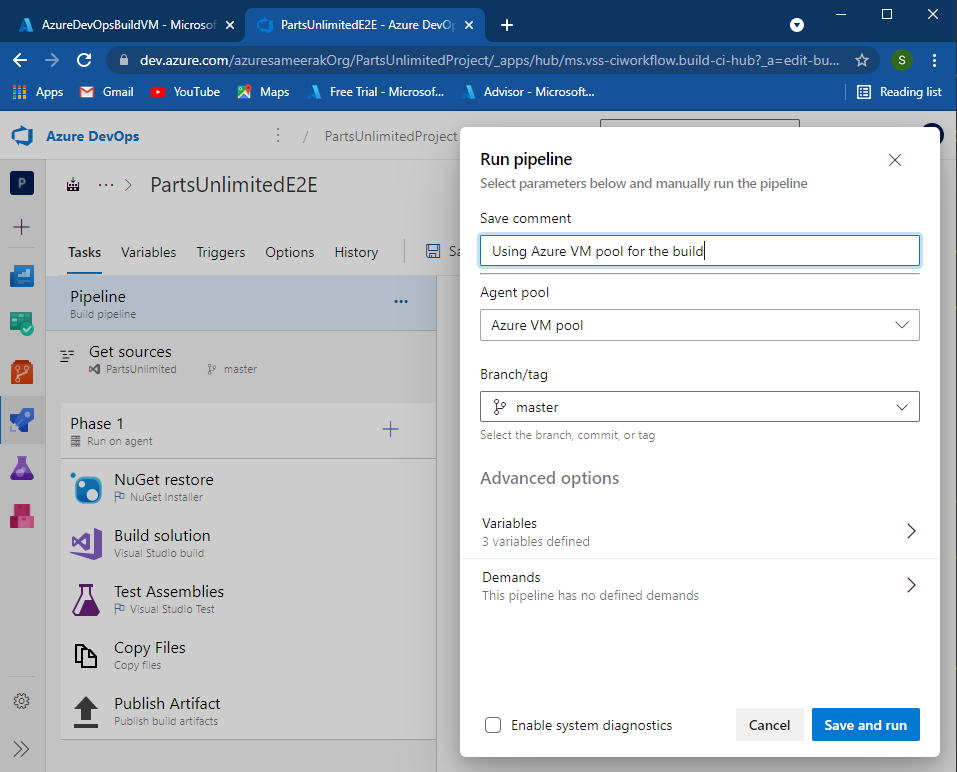
1.5. This will prompt you to enter the configurations for the new agent pool. Select "Self-hosted" as the pool type and give it a name (we are going to use this name to like the build agent to this pool). I named the pool "Azure VM pool" which I will use when setting up the agent. Then click "Create".

1.6. New agent pool will be created and shown as follows.

1.7. Next step is to create a personal access token for the build agent to connect to this pool. To do this we need to navigate to the security page by clicking on the user profile button (circle with your initials) and then selecting security in the resulting menu as follows.

1.8. This will lead you to the personal access token page shown below. Click "New Token".

1.9. Give a token name, select your organization and you can leave the expiration date as is. Select the "Custom defined" authorization scope. We need to select agent pools scope from the scope list but it is not shown in the default scope set. To see it click on the "Show all scopes" at the bottom of the prompt.

1.10. Select both "Read" and "Read & manage" capabilities under the "Agent Pools" scope. Then click "Create".

1.11. Next, you will be given the generated access token. Copy and store this token for future reference as this is needed to configure the VM agent.

2. Creating and configuring the Azure VM agent
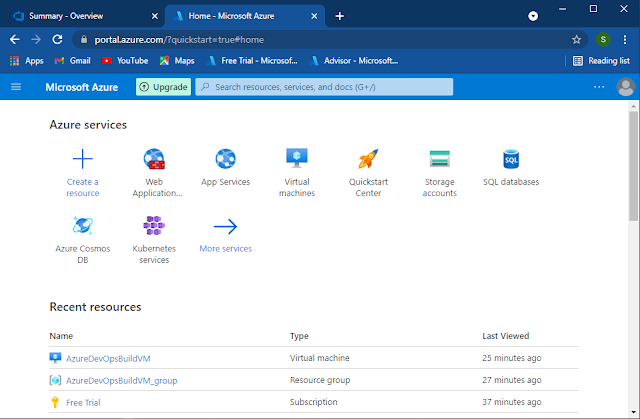
2.1. Navigate to portal.azure.com, and log in to your Azure portal.

2.2. Click "+ Create a resource" on the above page, and enter "visual studio" in the search box. This will result in the following page. Click "Visual Studio" VM high lighted by the red box.

2.3. In the following resulting page, click "Create".

2.4. Fill in all the required fields in the following resulting page. I only filled the "Virtual machine name" and let Azure create a new Resource group with an auto-generated name. You will have to provide user credentials for the new VM, so keep a record of these details as they are needed to access the VM in the later steps. Leave inbound port rules fields with default values. After setting all the fields click "Review + create".

2.5. Above step will validate the VM settings and present you with the following screen to confirm the creation of the VM. Click "Create".

2.6. This will start the deployment of the VM with a page similar to the following.

2.7. Deployment process will finish and you will see the following page. Click "Go to resource" to navigate to created VM.

2.8. In the following VM resource page, click "Connect" and select an option to connect to the VM.

2.9. I selected RDP as the connection option and was sent to the following screen. Download the RDP file from this page and run it. You will need to provide the user credentials you provided at the creation of the VM resource to connect to this VM and may have to authorise untrusted certificates of the VM.

2.10. When the RDP file is successfully run, you will see a remote desktop in your local machine accessing the VM as follows.

2.11. When you finish connecting to the VM and logged in a server manager window like the following screenshot will open up.

2.12. We will use this server manager window to turn off the internet explorer enhanced security configuration, to download the build agent software. To do this click "Local Server" from the left-hand side menu, and click on "Off" next to the "IE Enhanced Security Configuration" setting in the following window.

2.13. The above step will result in the following settings window. Select the Off option for both settings and click OK. This will enable you to download files from the internet using internet explorer. Alternatively, you can install a different browser in the VM which is not limited by this setting.

2.14. Switch back to your local machine and navigate to the new Agent pool you created in step 1.6.

2.15. Click on "New Agent" near the top right corner to get to the following screen.

2.17. Copy the "Download the agent" link from above page into the VM using the internet explorer and download the agent software zip. By default the zip file will be saved to the Downloads folder.
2.18. In the remote desktop session of the VM open a Powershell window (not the command prompt) as the administrator.
2.19. Execute the following commands in the opened Powershell window. Note that these are copied from the page shown in step 2.15.
mkdir agent ; cd agent
Add-Type -AssemblyName System.IO.Compression.FileSystem ; [System.IO.Compression.ZipFile]::ExtractToDirectory("$HOME\Downloads\vsts-agent-win-x64-2.188.2.zip", "$PWD")


Comments
Post a Comment